To change AirTag owner: the current owner removes it in Find My (Items tab, select AirTag, Remove Item). If the AirTag is out of Bluetooth range, the new owner manually resets it by pressing the CR2032 battery in and out five times. The fifth press produces a distinct tone confirming the reset. Then the new owner holds the AirTag near their unlocked iPhone to pair it. The whole process takes under 5 minutes when the AirTag is in hand.
An AirTag is tied to exactly one Apple ID at a time. You can't just hand one to a friend and have them pair it — it'll throw an "AirTag Already Active" error every time. The process to change AirTag owner is straightforward, but the order of operations matters. I've walked through this process with a few secondhand AirTags, and the most common mistake is skipping the account removal step before handing the device off. I've also helped people troubleshoot stuck resets where the battery wasn't seating properly — that fifth press is the one that trips people up. Here's how to do it right.
- Changing AirTag owner requires three steps: remove from Find My, reset manually if out of Bluetooth range, then pair to the new iPhone.
- The manual reset requires five separate battery press-and-release cycles; the fifth produces a distinct, longer tone confirming the reset.
- If the previous owner hasn't removed it from their Apple ID, the hardware reset alone won't fix the "AirTag Already Active" error. Both account removal and reset are needed.
- AirTag 2 (January 2026) has an identical ownership transfer process to the original; the 60m Precision Finding range and 85dB speaker are upgrades, but the pairing flow is unchanged.
- When buying a used AirTag, always ask the seller to remove it from their Find My before handing it over. That single step eliminates 90% of transfer headaches.
Can You Transfer AirTag Ownership?
Yes. AirTags are fully transferable. There's no carrier lock, no hardware restriction, nothing stopping the same AirTag from being registered to different Apple IDs over its lifetime. The only constraint is software: once paired to an Apple ID, it won't pair to a second one until the first owner releases it.
Once released, it behaves exactly like a brand new AirTag out of the box. No trace of the previous owner's name, no history, nothing. The new owner gets a completely clean setup experience.
One thing worth knowing for AirTag 2 (released January 2026): the transfer process is identical to the original. Apple didn't change the pairing or removal flow with the second generation, so everything below applies to both Gen 1 and Gen 2.
Step 1: Remove It from the Current Owner's Apple ID
This step requires the current owner, and the AirTag needs to be within Bluetooth range of their iPhone (roughly 10 meters). If it's already in the new owner's hands and you can't get it back in range, skip to Step 2. The manual reset handles it from there.
- Open the Find My app on your iPhone.
- Tap Items at the bottom of the screen.
- Tap the AirTag you want to transfer.
- Scroll down and tap "Remove Item."
- Tap "Remove" again on the confirmation prompt.
That's it. The AirTag disappears from your Find My. If it was in Lost Mode, removing it from your account automatically deactivates Lost Mode. You don't need to turn that off separately before handing the device over.
According to Apple's support documentation, if the item isn't nearby when you do this, it can still be removed from your account. But the AirTag must then be manually reset before anyone else can register it. That's what Step 2 covers.
Step 2: Reset the AirTag Manually (if out of Bluetooth Range)
Skip this entirely if you completed Step 1 while the AirTag was nearby. But if the original owner couldn't do the app removal because the AirTag was already shipped, gifted without unlinking, or purchased secondhand from someone who forgot, the new owner can reset it manually. The reset clears the previous owner association from the AirTag's hardware. Apple's official reset instructions are at support.apple.com/en-us/102577 if you want to cross-reference the steps.
How to manually reset an AirTag:
- Press down on the polished stainless steel back cover and rotate counterclockwise until it stops. Lift off the cover.
- Remove the CR2032 battery.
- Place the battery back in and press down until you hear a sound. That confirms the battery connected.
- Repeat steps 2-3 four more times (five total battery insertions). On the fifth, you'll hear a different, slightly longer tone. That's the reset confirmation.
- Replace the back cover: line up the three tabs, rotate clockwise until it locks.
Five presses, not four. Each one needs to produce a sound before you pull the battery again. If a press produces no sound, the battery didn't seat correctly. Press more firmly. A weak or nearly-dead battery can also cause the sequence to fail, so if nothing's working, replace the CR2032 first and try again.
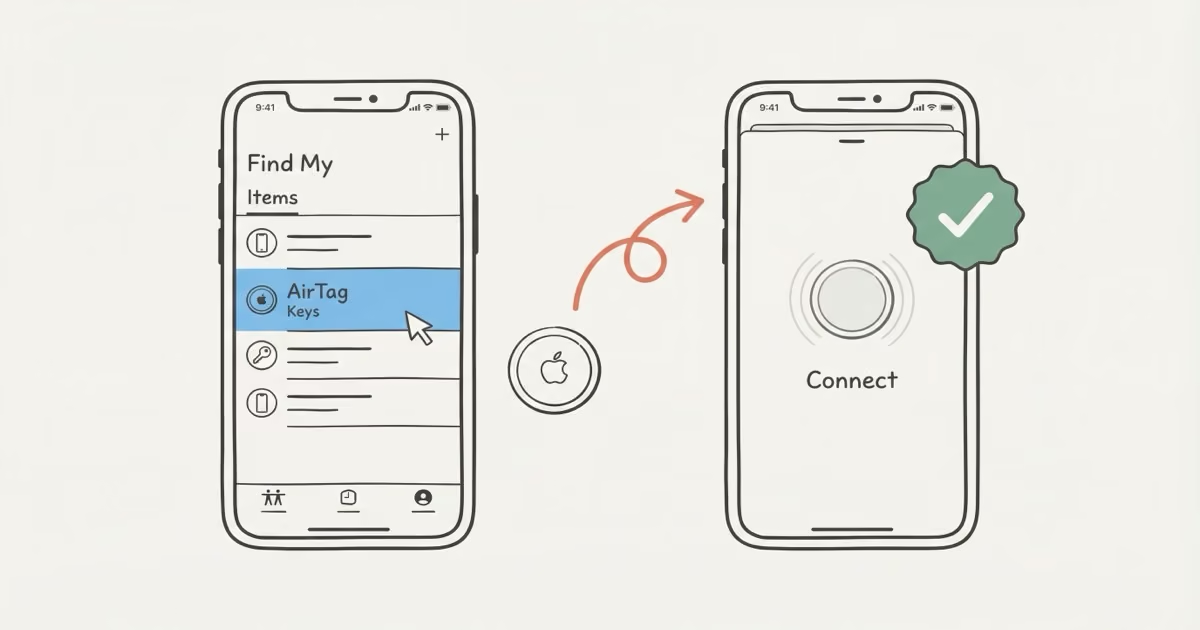
Step 3: Pair with the New Owner's iPhone
With the AirTag released from the previous account (and reset if necessary), the new owner pairs it the same way they would with a brand new device out of the box.
- Make sure Bluetooth and NFC are on. Both are enabled by default on iPhone. You'd only need to check if you manually turned them off at some point.
- Hold the AirTag close to an unlocked iPhone, within a few centimeters of the top edge of the phone.
- Wait for the "Connect" prompt to appear. Tap it.
- Choose a name for the AirTag: Keys, Wallet, Bag, or anything custom.
- Tap "Register AirTag" to link it to the new Apple ID.
The AirTag now shows up in the new owner's Find My under the Items tab. They can rename it, enable Lost Mode, or share its location with family members from there. Takes about 90 seconds once the pairing screen appears.
Buying a Used AirTag: What to Check First
Ask the seller to remove it from their Apple ID before handing it over. That single step eliminates 90% of transfer headaches. An AirTag that's still linked to someone else's account will block pairing, and if you can't reach the seller afterward, you're stuck waiting for Apple Support to sort it out with proof of purchase.
Things worth checking on any used AirTag:
- Battery age: CR2032 batteries last about a year under normal use. Ask when the battery was last replaced. A $2 battery swap isn't a big deal, but factor it in.
- Physical condition: Check the stainless steel back for any warping or damage that might prevent a good battery seal. A loose cover means the battery connection can drop intermittently.
- Gen 1 vs Gen 2: AirTag 2 (January 2026) extended Precision Finding range from roughly 40m to 60m and made the speaker 50% louder, with average sound levels jumping from 66dB to 85dB in testing. If buying used, check the box or confirm in Settings → General → About after pairing.
On the Gen 1 vs Gen 2 question: if the price gap between a used Gen 1 and a new AirTag 2 is small, buy the new one. The range and speaker improvements are real upgrades, not spec sheet padding. For luggage tracking or ski gear where the item might end up 50+ meters away across a baggage claim, the Gen 2 range matters. New AirTag 2 is $29. That's hard to argue with.
Troubleshooting Transfer Problems
"AirTag Already Active" error: The AirTag is still registered to a previous Apple ID. Only the original owner can fix this through their Find My app. If you bought it secondhand and can't reach the seller, Apple Support can release it, but expect them to ask for proof of purchase and allow several days for the process.
Reset won't complete: You need five separate battery presses, each producing a sound. If you're not hearing the confirmation sound on press three or four, the battery isn't seating. Try pressing more firmly or at a slightly different angle. I've seen this happen consistently with older or slightly discharged batteries. A fresh CR2032 fixes it almost every time. If the AirTag has been sitting unused for months, swap the battery first. A low battery breaks the reset sequence consistently. Other AirTag pairing failures sometimes have different causes, but for the reset specifically, the battery is almost always the culprit.
"Unable to Connect" during pairing: Hold the AirTag within 2-3cm of the top edge of the iPhone (where the NFC antenna sits). Restart the iPhone if needed. If the error persists after a confirmed reset where you heard the fifth distinct tone, the AirTag hardware may be faulty. An AirTag that keeps searching for signal after a reset is a different issue worth diagnosing separately.
New owner can't find AirTag in Find My after pairing: Check the Items tab specifically, not Devices. The AirTag takes a moment to appear after registration. If it's not showing after a minute, force-close Find My and reopen it. If the AirTag isn't updating its location, that's a separate networking issue that happens after successful ownership transfer.
AirTag 2 Specs if You're Starting Fresh
The Bottom Line
Changing AirTag ownership is a 3-step process: remove from Find My, reset if needed, pair to new iPhone. The only time it goes wrong is when people skip the account removal step, either because they forgot or because the AirTag was already out of Bluetooth range when they tried. If you're selling a used AirTag, remove it from your Find My before handing it off. Takes 10 seconds in the app and saves everyone a headache.
If you're buying used and the seller won't remove it beforehand, walk away. An AirTag locked to someone else's account is a support ticket waiting to happen.
Frequently Asked Questions
How do I change AirTag ownership?
Remove the AirTag from the current owner's Apple ID via Find My (Items tab, select it, Remove Item). If out of Bluetooth range, the new owner resets it manually by pressing the CR2032 battery in and out five times. The fifth press produces a distinct tone confirming the reset. Then the new owner holds the AirTag near their unlocked iPhone and follows the pairing prompt to register it to their Apple ID.
Can I transfer AirTag ownership without the original owner?
You can do the hardware reset (five battery presses) without the original owner, but if they haven't removed it from their Apple ID, you'll still hit the "AirTag Already Active" error when pairing. The reset alone doesn't release the server-side registration. The original owner needs to do the Find My removal, or Apple Support can release it with proof of purchase.
Do I have to factory reset an AirTag before giving it away?
Only if you're unable to do the Find My app removal while the AirTag is in Bluetooth range. If you can run through the Remove Item steps in Find My before handing it off, the new owner doesn't need to do the manual battery reset at all. The app removal is cleaner and faster. The five-press reset is the fallback for when the app route wasn't possible.
Can two people use one AirTag?
No. An AirTag registers to one Apple ID at a time. If you need two people to track the same item, the registered owner can use the Share Item Location feature in Find My to share a live location link. The other person sees the location without owning the AirTag. That's the right way to do it. See our guide on connecting an AirTag to two phones for the full breakdown.
What happens if someone finds my AirTag?
Anyone with an NFC-capable phone (iPhone or Android) can tap a lost AirTag to see the owner's contact info and a message. No app required. AirTag 2 adds non-owner Precision Finding: if someone with a supported iPhone finds your AirTag, they can use the directional arrow to pinpoint its exact location and return it with the item attached. Enable Lost Mode to display your custom message and contact number. Our AirTag Lost Mode guide covers the full setup.
How do I know if a used AirTag is still linked to someone else?
Try pairing it by holding it near an unlocked iPhone. If it's still registered to another Apple ID, you'll see the "AirTag Already Active" error immediately. If the normal pairing screen appears with a name prompt, it's free and ready to use. Always confirm with the seller before money changes hands. Discovering it's locked after purchase means you're dependent on the seller's cooperation to fix it.
Does AirTag 2 have a different transfer process than the original?
No difference at all. Same Find My app removal, same five-press battery reset, same pairing procedure. The Gen 2 hardware improvements (longer range, louder speaker, Apple Watch support) don't touch the ownership transfer flow. The process that worked on a 2021 AirTag works identically on a 2026 AirTag 2.